How to setup and configure Voice of Customer
After reading this blog, You will be able to do following:


There are following security role imported in CRM when you setup Voice of customer:

If you want to Create,Update,Delete and Design a survey then you must have "Survey Administrator" or "System Administrator" security role.


You can choose any type of question like
Single response, multiple response etc.


- Set up Voice of Customer in MS Dynamics 365.
- Design and publish Surveys.
Prerequisite:
User must have MS Dynamics 365 subscription.
Limitation:
Only internet explorer supports survey's designer form.
Setup Voice of customer:
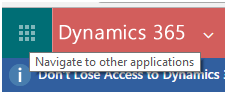
Click on “Navigate to other applications”
Go ToàAdminà Admin Centerà Click on Dynamics 365

Click on application tab:

Select Voice of customer and click on
manage.

Wait for few minutes until you get "install" message.
What happens in CRM
There is new primary ribbon added in
Dynamics 365 with name “Voice of Customer”.
Main entities in this module are:

There are following security role imported in CRM when you setup Voice of customer:
If you want to Create,Update,Delete and Design a survey then you must have "Survey Administrator" or "System Administrator" security role.
Surveys:
Survey is main entity of “Voice of
Customer” We need to create a survey and need to send link to customers from whom we
need feedback.
Create a survey
Creation of survey is same as you create
other entity records.
Go ToàVoice
of CustomeràSurveyàClick on new

Fill all required information and click on
save:

Now select designer form as mentioned in
below screen shot:

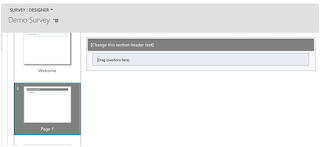
There are total three pages in survey
designer:
·
Welcome: Set survey welcome
screen
·
Page 1: Set survey questions here.
·
Complete: Set complete message
of survey.
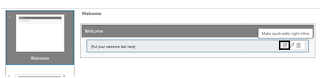
For welcome screen, Click on quick edit to
update welcome screen:

Click on save highlighted in yellow in
below screen shot once you edit welcome text.

Page 1 is for questions. You can drag and
drop questions here

All Question types are in right navigation
of survey designer:


Once you drag question, a new form will get open and you can edit your question here.

Click on save or save and close and you will return to survey designer:

Click on save or save and close and you will return to survey designer:

I added another question in new page. To add a new page select Question page and click on add:

Page 2 is a new question page, I
added a long answer question in this page:

Complete page: This is the last page of
Survey designer and we can write message here like “ Thank you for sharing your
feedback” or leave it blank.

Publish a survey
Click yellow highlighted button to publish
a survey.

After publish, anonymous link and email snippet
are available on survey:

Survey invitation:
·
By email:
Now we have two
links Anonymous and email snippet. If we need anonymous response then copy
anonymous link in email else copy email snippet.
·
By other mode:
In this case we need to
create survey invitation.
Test Survey
You can test survey by clicking on
anonymous link or Test button or Preview button. Below are screen
shots of "Demo survey":

Screens of "Demo survey":


Comments
Post a Comment